
Showing posts with label Tutorial. Show all posts

Wednesday, September 18, 2013

Zimmer-it! The tutorial...

 As I'm slowly progressing, I thought it'd be nice if I'd share my expieriences with you.
What you need for making zimmerit with this method:
  • a plastic model
  • liquid plastic glue (I used revell)
  • Masking Tape (optional, I used Tamiya)
  • a micro screwdriver
  • an old, fine brush
  • an exacto knive
  • a timer (if you're unfocussed like me)
  • patience (mandatory)
  • a respirator or an outside-workplace


Before you start let me state the most important thing:
You'll be working with a lot of cement here. Stuff that melts plastic. If you don't take care of yourself, this stuff will melt your brain over time. And this piece of work would be the most perfect opportunity for a molten brain, as you'll hang your nose over molten plastic for quite a long time.

Please do this at a place with very very good ventilation (outside with a fan that blows fumes away) or use a proper (!) facemask with the right filters (which I do).


First of all, I cut tiny pieces of masking tape and apply it to the tank. This will look like spots where the zimmerit has fallen off later.


Now apply the cement to the model. Don't use too much, or your pattern will look blurred, because the plastic will be soluted so much, that it will slowly flow back after you worked it. You'll need to try and find the right amount of cement for every specific model (u know, the plastic differs and stuff like that...)

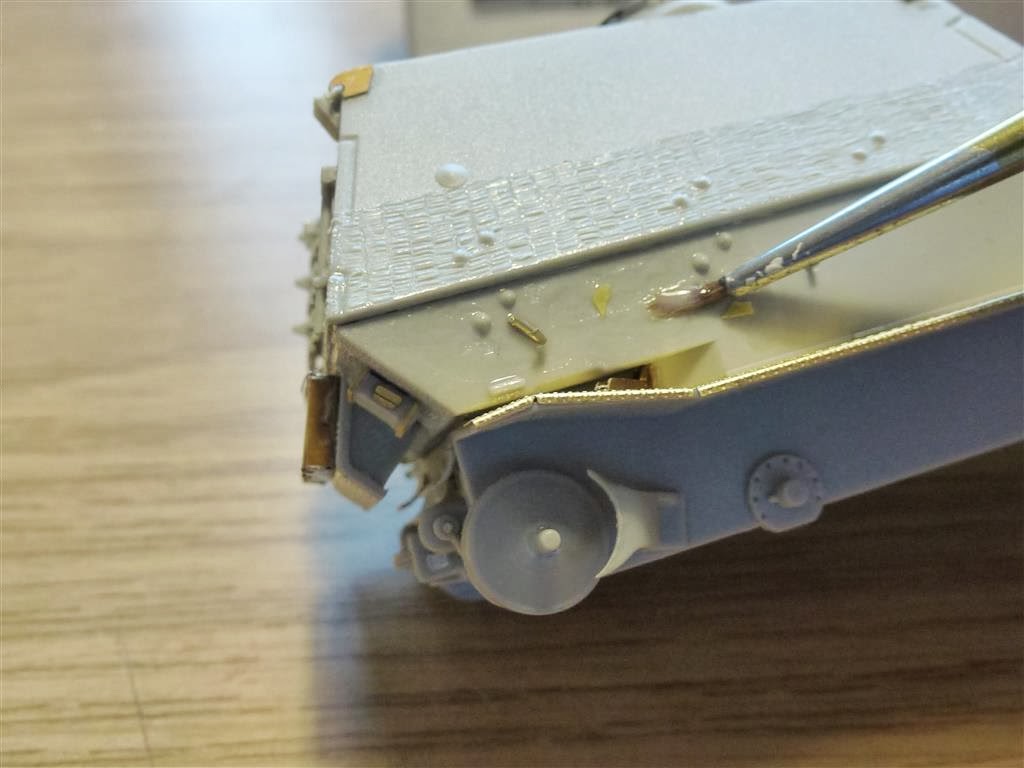
 Now be very fast and grab your old brush. Spread the cement evenly over the surface. Don't do too much at once!
Should look something like this now:
 Now wait for 10 minutes. I use a timer, as I'm likely to be distracted by something shiny and I'd surely forget about my little elefant here ;)
 Meanwhile you can prepare your screwdriver. As I didn't have one in the perfect size, I used sanding paper (800) to sand it to the correct size.

When the time's run out, start the pattern on the middle of the prepared surface. Why? You're likely to have skewed edges like on the back of the elefant. If you start there, you probably won't be able to get a perpendicular zimmerit pattern. So just start somewhere in the middle and work your way to the outside (it can be seen if you zoom in)

Place your screwdriver on the plastic and push it in. Regard that the whole edge of the blade digs into the plastic evenly. If you hold your screwdriver in an angle (not the blade like in the picture! This must be in a square angle to the perpendicular!) while pushing, you won't get a rectangular imprint which is not what we are going for. So set your handle in an 45° angle.
Since you won't be able to reach all the places with your Screwdriver, you' sometimes need to use your exacto knife. Just draw short lines, similar to what you'd archieve with the screwdriver.
If the plastic is already getting to hard to work with, apply a very small amount of cement to those places and WAIT for 5 minutes, before working on them. Again, if you are too eager, the plastic will stretch out again while still being soluted.

When you're done, use your exacto knife to dislodge the masking tape. Don't wait too long with it, as it might melt right into place.

 If you work carefully, you can achive a nice pattern as on the top-half; If you want to go for the sloppy look, simply do it sloppy ;) Always keep in mind that Zimmerit has been applied by humans and doesn't look to perfect most of the time.

I hope you like it. Remember to take care of your health and please follow the hints I gave above. I won't sign responsible if your grey matter flows out of your nose and ears ;)

Best Regards,

Mojo


Monday, March 12, 2012

Basic basing tutorial

Hey there,
in my "home-forum" there are some new kids who have quite some trouble with "how-to-base-a-figure".

I thought, I'd show the rough process with a little video. The output is quite long with 12 minutes, as I was too lazy to cut a lot and redo some scenes that didn't work well. However, this is my first video tutorial, so don't be too harsh on me, when things happen out of focus ;-)

Here we go:


Have a nice evening!

//mojo

Thursday, January 26, 2012

DIY: 1/72 Scale Tank Ammunition

Hey girls,
sorry for keeping you waiting. I needed a little timeout desperately yesterday. So here's how it works.

What you DO NOT need:


A lathe. I am pretty sure you have all (or at least most) of what you need around...
First, some information about what you are going to recreate. I found mine here:
http://www.network54.com/Forum/47207/message/1276298562/Ammo.
Sure, it's about the Stu. K. 40, but it will do for me.

Here come the tools and stuff:
  • Some kind of multitool. I use a Dremel
  • A caliper
  • Some small and fine files
  • Some very fine sanding sheet 
  • 2mm round steel rod
  • a saw
  • and a sketch with scaled measurements, made from your information source...


Lets start off! Saw some 3cm from your rod.

Insert it into the chuck of your multitool and choose a file with a sharp edge.
We start with the skew near the front end of the empty shell.
Turn the multitool on and press the file on the turning rod about 2mm away from the end.

You should have something like this after a very short time:

Now we will slim down the front part to 1mm (roughly 75mm in 1/72).
Hold your file flat and pay attention not to "harm" the skew side!

When you got it down to 1mm, measure how long the frontal section may be. 
In my case, its about 0.7mm. Use a sharp edged file to "cut" it off:

You can really make clean cuts with this method.
This is what it looks like, shortly before it's cut:
Maybe you have use of shapes like that in some other project.

Next: Measure the overall length of the shell. In my case thats about 7mm.
Mark it on the rod.

Make a shallow cut right at the 7mm spot.

Now use your flat file again and try to position it like shown below.  A very thin rim should remain! 
Begin to turn the shell thinner until you reach 1,5mm.
While doing that move the file back and forth to obtain a level thickness.
Do not press too hard when you come closer to 1,5mm!

When you have hit the mark, take the sanding sheet and polish your shell.

If you're really keen, you try to drill the shell with a 0.9mm drill.
Let the multitool do the work while you just press the drill against the shell, using a drill handle.

Looks like that:
When you're done, you can cut the shell off the rod and continue on the next level:

Do a shell with a grenade :)

It took a bit longer to do the two new shells (left and middle), but it was quite worth the effort.
I did not cut the rod off completely because I need a base for making a mould.

And here's a little Mock-Up to show the size in comparizon with a 20mm figure:

I hope you enjoyed this tutorial!

Warm welcomes go out to:
Nick Grant (http://20mmgamer.blogspot.com/)
Marcin Nowogródzki( http://mnowogro.blogspot.com/ )

You guys filled the 75 followers :) Thanks!
Another round value: This is my 80th post :)

And a "thank you!" goes out to the blogspot-folks at google who finally replaced the "New Post" link in the blogspot headline with a "Dashboard" link! That doesn't really save much time, but still makes life a bit easier   here :)

Good night!
//mojo


Friday, January 20, 2012

Preparing plastic bods


Good evening,
today I'll start  to show you, how I prepare my 1/72 (20mm) Plastic figurines for painting. The figures, which are used here, are Ceasars "WWII German Army with Camouflage Cape".
First, I sort out, which figures I'm about to use from this set, depending on what I need for my wargaming units. At this time, my focus lies on K98 troops but since they are kind of rare in this set, I need to use some MP 40 and StGw 44 sickos if I don't want to waste half of the set. I generally do not use more than 2 figures with the same pose, if possible, better only one...


Next step, I glue them to 2 European Cent-Coins, using PVA. Takes quite a time to set and does not work with all kinds of plastic. Especially Italeris "German elite troops" won't stick with it very good. They're either cowards or Blitzkrieger ;-)


Step thee: Unflashing! In the picture above, you can see quite a big piece of flash at the left lower edge of the cape. This is pretty unusual for Ceasar figures, as far as I can say after buying my second box. Nevertheless, I'll put quite some effort in these figures, so I won't let this step out, even if it's quite time-consuming and air polluting. Here's how it works:

I pierce a long needle through a cork from a wine bottle to have a handle. Next, heat the needle up, using a candle. When it's hot enough, wait about a second and scrape along the flash line on the figure. Be sure to keep the needle as clean as possible! What you see below is much too "dirty" and will stick with the figure in the next iteration of unflashing.

The figures always have some mould-release-agent on the body on which your colour will not attach very well. Since these poor bastards are frozen like Han Solo, they won't go and have a cleanup by themselves like my grandpa's pal does on the pic below :)


So you'll use some warm water with detergent and a toothbrush (hello DotT :) ) and scrub them. They are dirty bastards, late war, have marched some thousand miles, almost to Moscow and back. They are lousy and filthy. Give it to them!
When they're spick and span it's time to correct all those bent weapons. Here's an extreme example of a Landser who cuddled his Panzerfaust a bit too much:

The figure's pose  itself is way too cool to not to be used (was this a correct sentence? =) )
The trick is: Hot water. Use your microwave oven, a stove top, fire some rounds with your vickers machine gun or use anything else to heat up a small bowl of water. I think this step works from 75°C onwards... Don't make it too hot or you'll brew your clumsy fingers and poor plastic soldier! If you're doing brits, you have the chance to earn the title "Tommy-Cooker" ;-)
 Dip that poor lad into the water and wait for a few seconds. After you saved his life by pulling him out, use your fingers -or better- some flat tweezers to bend the Panzerfaust, his third leg or what ever to what it should look like:

Done.

In the follow-up post which is to come in a few days (maybe earlier), I'll show you how to boost combat the moral of your troops before painting them :)

Stay tuned!

Oh, but also tune in on my brand new followers!
Welcome Anne O'Leary (http://fortwitter.blogspot.com/), Zed (http://lonewolvesclub.blogspot.com/) who made me hit the SEVENTY FOLLOWERS MARK (Thanks for that!) and Anibal Invictus (http://mylardiesgames.blogspot.com/)
!!!


Cheers,
Mojo

Wednesday, January 11, 2012

Your very own rust pigments

Hey boys! During the last point I introduced the way I produce pigments from pastell chalks.
Fran asked, if he should try it. Mojo says: Go ahead, dust them models! It'll take the factory-look from your tanks and stuff!

Today I'll show you how I produce rust pigments. You can spend lots of money on pigments if you want to use them. But seriously, I don't think they're really worth it. You can have it much cheaper with the same result:


First, go get some ako/Brillo Pads. You know these. It's steel wool combined with soap used to make crusted pots shiny again. I got mine at woolworth for about 2 bucks per 12 pads. I should have. But I didn't notice that someone had opened the box and took 2 out. Some people really seem to be desperate for them...


Now go ahead and scrub the soap out of a pad. Maybe you'd polish the sink while doing so. Your wife is gonna think you're ill, but your not. You're doing hobby stuff. Always.
Afterwards, put it into a jar or on a plastic cap and make it damp (not wet). After the first night, you will notice the first oxidation. If the pad is dry, tear it appart and try to separate the rust from the steel. The earlier you get it off the rest, the better and brighter your pigment will be. Keep this bright rust dry in an extra container and soak the rest of the steel again. If you wait too long before separating, you'll get something like this:
Well its still some kind of pigment, but not what I aimed for. Anyways, I worked on with it to show you what to do.

 If you got enough of the bright rust, put it into the mortar and crush it. Make it as fine as possible:
 You might notice that there are some steel threads remaining. You can get them out in two ways: Sift it!
 Surely lots of the threads will fall through again, but still, sifting has another benefit as it makes the pigments even finer. It breaks up the clumps that evolved while crushing it inside the mortar.

The second way is to use a magnet. Put a weak magnet into a face tissue and hover above the rust. As rust is much less magnetic than the steel, most of it will remain where it is, while the steel will stick to your magnet. Anyhow, the steel threads take lots of pigments up with them, so I suggest to gently knock 'em off inside your mortar.


 You can then put the steel threads into water again, but I don't recommend that. You'll better use a second/third/forth pad instead, because the outcome on wetting the remains is very small and very brown.
This is what I got out of one pad. 50/50 pretty  bright rust and pretty rotten steel. Not too bad.
Apply these as usual with either pigment fixer or matte varnish.

Try it out! I hope your wife/girl won't hate me for the mess you'd possibly produce, but on the other hand...
If you polished the sink, she might even like me :)


There are another three new followers! Check them out:
Another Thomas :)
http://mollwitz.blogspot.com/ and http://schmockblog.blogspot.com/
Monty whom I know from the german "Behind Omaha" Tabletop Forum recently started his own blog!
http://montys-caravan.blogspot.com/
and last but not least: Schrumpfkopf with another two blogs:
http://schnitzel-miniatures.blogspot.com/ and http://blog.retromite.com/

//mojo

Monday, January 9, 2012

Pigments production

Hey all,
I wish you a pleasant, happy and healthy new year with lots of time for your hobbies :)

I'd like to start the year with some thing I bought recently. For conveniance reasons I'm not happy with scraping small amounts of pigments from my pastell-chalks with an old cutter knife. This takes like forever to get a usable amount of pigment.

What I bought is a mortar with a pestle:

I got this for 2 European Credit Units at Woolworth, which you might have somewhere around you, too.

 I put a 1/3rd of the pastell chalk in it and crush it. Don't go for more at a time if you fancy very fine pigments.
 This thing is a real timesaver. If I only had bought this before...

One more thing: I'd like to welcome my new followers:
CPBelt
http://ordinarygaming.blogspot.com/
Michael Scott
(aww snap, no blog?!  :) )
Thomas
http://thomasmegas.blogspot.com/
Bragondorn
http://bragondorn.blogspot.com/
http://asquirrelstail.blogspot.com/

Good to have you on board ;-)

//mojo

Thursday, October 20, 2011

Tutorial: Tarps for Sd. Kfz. 251


Hey guys! Sorry, it's been a while and I wish I had time to put this up a few days earlier... But you know... Yeah you do, so let's get started ;)

As promised, this is about how to make tarps for Armourfasts Sd. Kfz. 251. Of course you can use this method for anything else, maybe some wild-west-cart or whatever you can imagine :)

First, I decided to make a base for my works, because I didn't want to handle the freshly painted hanomag all the time.
I measured the outer edges of the open cabine and made polystyrene sheet with exactly those measurements, so it can just be put on top. It's roughly 35mm x 20mm, but please measure for yourself.


Next step: Drilling holes for the bails. I tried to find some images of hanomags with tarps, but they are rather hard to find. In the end, I drilled by sense of proportion ;)
You need to drill as close to the outer edge as possible. Also, you should drill a little skewed, so that the bent bails fit perfectly. I won't go into depth here, just look at the picture above, where I tried to mark the skewness with blue arrows.
Please keep in mind that the bail at the back is tilted a bit forward! 

For the position of the holes, I used (measured from the back) 0,7mm; 13mm; 25mm. This might be inaccurate because the foremost bail sits far further in reality. You can do this as you wish, but it proved perfect if you want to place a figure at the front of the open top or want to leave the machinegun uncovered.

I used a 0,8mm drill because I had copperwire in the same strength.
Now cut some copper wires to 24/25mm long pieces and bend them to a shallow slope. They should just slip into the drilled holes. Fix them with CA. As always when you work with CA, you should wear gloves.


Right now, you should place the whole thing on top of your hanomag and decide what you want to do with the front part of the tarp. As I mounted my machine gun with the butt hanging down, I had to carve some part of the base, so that the tarp can hang down into the compartment and the Machinegun as whole can stay visible.
If you plan to place a figure, you have to carve out a lot more. In fact I left about 3mm after the foremost bail.


 You can put the gloves on again , as we will continue working with CA (as you can see, I forgot it and instantly sticked to my project :-D ). Take a piece of tissue, roughly 35mm wide and 45mm long. Put a drop of CA on the very top of each bail-wire and press the tissue on it. 
As soon as its dry, you can start to put CA on the left half of the bails (from top to bottom). Do all three bails at once. If you are fast enough, you can also put CA on the edge of the left side of the base. 
Now pull the tissue against the CA. Be careful not to tear it appart!
If you are done with it, do the same on the right side.

If you are done, you should have a nice tunnel of tissue :)
Now fix the tissue to the back edge and to the (carved) front edge.
Just to be sure, I went around the edge and added another layer of CA.

When its dry, use a sharp knife and cut off the overhanging tissue. It should look like this:


Pretty nice, eh? Don't crow to soon. It'll look ugly in a minute. 
To add some stability, we need to cover it all up with some heavily thinned white-glue. Apply 3-4 coats of it with a soft brush, letting every coat dry for about half an hour at least. My tissue began to slobber when it got wet and in the end it looked like sh-t. I almost threw it away and filed it as another trial-and-error-error. But that would have been wrong. The solution is simple:
Take another part of tissue (again 35mm x 45mm), wrap it tightly around the tarp and start soaking it with thinned white-glue. While it dries, apply a fair tension to the tissue. This time it will not slobber. Again, 3-4 coates of White-Glue strengthen the whole thing, when you're done, cut off the remains.

Now you can paint it as you wish. Hopefully the result looks roughly like this:


After applying a coat of gloss varnish, add some ink/wash to emphasize the folds (yet to be done on my hanomags).

I hope this helps and inspires you guys :)
If you do something similar, blog it please :) I'd like to see your results!

Cheers, Mojo