Showing posts with label 20mm. Show all posts

Monday, June 16, 2014

Figure basing - Whatever structure you want!

Hi all,
while making my TDQ-Figs, I had some trouble covering up those Slotta bases without making them even higher. I was breeding about this problem quite a while until I had an idea. You'll need some kind of silicone or other moulding stuff (instamould or sth. like that) and some acrylic filler that you can get in any DIY-Store.

First, drop some of your moulding stuff on the structure that you want to see on your base. Wait until it cures and pull it off. No need for a thick layer as you can see...


Than smear a thin layer of the acrylic filler on it and smoothen it with a wet finger. Let it dry and pull it off the moulding stuff carefully.
The filler will remain sticky for quite a while after curing, so be sure to prevent stacking or folding those layers.


Then make a straight cut that allows you to "wrap" the structure around your minis feet and cut out some place to stand


Like this:

Afterwards use some all-purpose adhesive to stick it to your mini. Since this stuff is very flexible, you can perfectly close the cutting lines and make a very tight fit around the feet of your mini. BUT!!! Don't cover the edging of the base like I did it in this picture. It'll collect the dust off your table ;) Cut it off clean around the edge.


I used cobblestones, wood-plank-floor and a stone wall as a master for these acrylic layers. Here's the result after a layer of varnish (which deals with the stickiness) and some ink.


In the beginning it's quite time-consuming, but after the 5th figure it was getting easier and faster :)


You can also use this method if you have some partial ruins like this...


...which covers only half of the house. I find this looks somewhat odd, so I will simply create the rest of the ruined walls with foamboard and add the original texture with an acrylic layer.


Hope you like it!

Best Regards,
Mojo

Friday, June 13, 2014

Some finished TDQ Figures

Hi there, I finished some TDQ-figures...
I thought this might be a perfect opportunity to revive this Blog once again :)

Here we go...


I can already hear you scream "Oh those ugly slotta-bases!" 
Yes, I am aware of that! I'll probably get the beltsander ready and scrub them slottas until they're slim :)

Hope you like 'em anyway!

Mojo 

Wednesday, September 18, 2013

Zimmer-it! The tutorial...

 As I'm slowly progressing, I thought it'd be nice if I'd share my expieriences with you.
What you need for making zimmerit with this method:
  • a plastic model
  • liquid plastic glue (I used revell)
  • Masking Tape (optional, I used Tamiya)
  • a micro screwdriver
  • an old, fine brush
  • an exacto knive
  • a timer (if you're unfocussed like me)
  • patience (mandatory)
  • a respirator or an outside-workplace


Before you start let me state the most important thing:
You'll be working with a lot of cement here. Stuff that melts plastic. If you don't take care of yourself, this stuff will melt your brain over time. And this piece of work would be the most perfect opportunity for a molten brain, as you'll hang your nose over molten plastic for quite a long time.

Please do this at a place with very very good ventilation (outside with a fan that blows fumes away) or use a proper (!) facemask with the right filters (which I do).


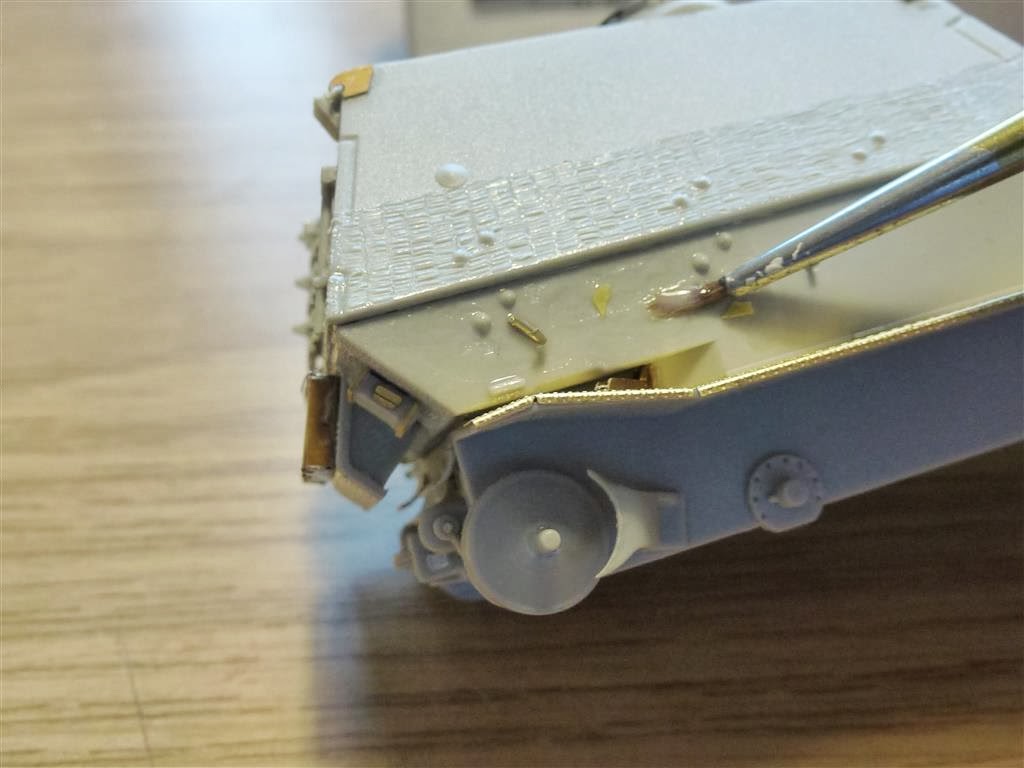
First of all, I cut tiny pieces of masking tape and apply it to the tank. This will look like spots where the zimmerit has fallen off later.


Now apply the cement to the model. Don't use too much, or your pattern will look blurred, because the plastic will be soluted so much, that it will slowly flow back after you worked it. You'll need to try and find the right amount of cement for every specific model (u know, the plastic differs and stuff like that...)

 Now be very fast and grab your old brush. Spread the cement evenly over the surface. Don't do too much at once!
Should look something like this now:
 Now wait for 10 minutes. I use a timer, as I'm likely to be distracted by something shiny and I'd surely forget about my little elefant here ;)
 Meanwhile you can prepare your screwdriver. As I didn't have one in the perfect size, I used sanding paper (800) to sand it to the correct size.

When the time's run out, start the pattern on the middle of the prepared surface. Why? You're likely to have skewed edges like on the back of the elefant. If you start there, you probably won't be able to get a perpendicular zimmerit pattern. So just start somewhere in the middle and work your way to the outside (it can be seen if you zoom in)

Place your screwdriver on the plastic and push it in. Regard that the whole edge of the blade digs into the plastic evenly. If you hold your screwdriver in an angle (not the blade like in the picture! This must be in a square angle to the perpendicular!) while pushing, you won't get a rectangular imprint which is not what we are going for. So set your handle in an 45° angle.
Since you won't be able to reach all the places with your Screwdriver, you' sometimes need to use your exacto knife. Just draw short lines, similar to what you'd archieve with the screwdriver.
If the plastic is already getting to hard to work with, apply a very small amount of cement to those places and WAIT for 5 minutes, before working on them. Again, if you are too eager, the plastic will stretch out again while still being soluted.

When you're done, use your exacto knife to dislodge the masking tape. Don't wait too long with it, as it might melt right into place.

 If you work carefully, you can achive a nice pattern as on the top-half; If you want to go for the sloppy look, simply do it sloppy ;) Always keep in mind that Zimmerit has been applied by humans and doesn't look to perfect most of the time.

I hope you like it. Remember to take care of your health and please follow the hints I gave above. I won't sign responsible if your grey matter flows out of your nose and ears ;)

Best Regards,

Mojo


Thursday, June 13, 2013

Sd. Kfz. 164 Nashorn


Few days ago I finished a model that survived quite some ramblings...
I started building the Revell Nashorn in 2011 but often got distracted by other projects.
For Christmas 2012 I received a big parcel with Revell models.Since they came 4 free, I decided to get some PE parts for them (1st time!).
And I bought some for the Nashorn as well: PART Ammunition lockers :)
So I started up again and prepared everything for the Paintjob. I always paint complex models before fully assembling them, so that I can reach every spot without trouble.
Shortly after basepainting the hull, my photo fell from the cupboard and landed on the poor Rhino which was grazing 1m below on my desk. Damage could have been worse, since the Photo was in it's soft case. The Photo itself was alright, but the Nashorn was a bit battered. All roadwheel wagons on the left side had a crack, part of the upper hull was broken and the lifting eyelet broke of. All could be fixed with Superglue.
However, this incident shrunk my motivation and the Nashorn was set to the heap once again. In April I finished the basic paint job and added the few decals. As I was about to attach the tracks I started getting nervous because I couldn't find one of the drive-wheels. 
Well it was on the carpet and it obviously got to know the wheels of my office chair :(
It had broken into many pieces and motivation was down again.
I contacted Revells department X (They take care of spare parts), but after two weeks they'd let me know that the Nashorn was currently OOP and therefore no Spare Parts were available. Down again. I plucked up my courage and asked for a Panzer IV drive-wheel and finally got one (Big thanks to Revell!!). Only to realize, that the Nashorn utilized Panzer III drive-wheels. Utter motivational drop.

Eventually i took a huge load of superglue and puzzled with the smithereens of the original drivewheel. An hours work and lots of curses later, I had reconstructed is as far as possible. Only one third of the inner sprocket wheel is missing.
I placed this part of the wheel in a manner that it's covert by the tracks. Looks good, but track assembly didn't work like a charm as you can surely imagine.

I really had my hard times with this one, but that's absolutely not because of the model itself. The kit is great and the result is sweet in my eyes if I may say this.

Have a look:


The Crew is from MMS and looks really fine. I did some conversions on them though:

 The gunner needed repositioned legs to fit his seat...
 And the commander now makes use of his Scherenfernrohr instead of his binocs. I also cut his arm off and placed it on the ammo cabinet (and attached it to his shoulder again :grin: )


Currently I'm working on a big project for a competition. I'm going to finish it by the end of the month. Looking forward to present it... :)


Welcome to the new followers!! Glad to have you here!


Best Regards,
Mojo

Tuesday, April 17, 2012

The exceptional Pz. Kw. IV 223


Here we go! This is the last, the best, the exceptional of the trio

Number 223!

I know, self-praise stinks, but this one makes me really proud. That brainwave was just too good not to be implemented, besides the huge effort. This is the model, I lathed the 7,5cm ammunition for...


The Spare-Roadwheel-box with a wooden crate inside, instead of wheels. Made from the tin of a windlight.


Again, loads and loads of spare-tracks. This time from an old wrecked Matchbox Panzer IV. Since these tracks are made from vinyl, they virtually have no detail on their back, leaving me no other chance than mounting them the wrong way round.

The rather uninteresting side of the tank

Now for the special:
The loader disposes of the fired shells(violating the commandment from above).


This is an abused Preiser Figure. He once was a driver from the Mounted Panzergrenadier Set.

The left turret-side hatch with a viewblock and a handle for opening/shutting it.

The right turret-side hatch with the locking/unlocking handle.

Looking forward to your comments on this one :)

Cheers,
Mojo

Sunday, April 15, 2012

PSC Panzer IV 224

Here comes number 224:


The Schürze with the HE-hit is (together with the muzzle-break) the only modification on this tank.
I'm not 100% pleased with how the hit turned out, but to be honest: I can't see these tanks anymore, been working for much to long on them. It'll stay as it is ;)

Have a nice sunday evening and stay tuned for my last and most sophisticated Panzer IV ;)

Cheers,
Mojo