What you need for making zimmerit with this method:
- a plastic model
- liquid plastic glue (I used revell)
- Masking Tape (optional, I used Tamiya)
- a micro screwdriver
- an old, fine brush
- an exacto knive
- a timer (if you're unfocussed like me)
- patience (mandatory)
- a respirator or an outside-workplace
Before you start let me state the most important thing:
You'll be working with a lot of cement here. Stuff that melts plastic. If you don't take care of yourself, this stuff will melt your brain over time. And this piece of work would be the most perfect opportunity for a molten brain, as you'll hang your nose over molten plastic for quite a long time.
Please do this at a place with very very good ventilation (outside with a fan that blows fumes away) or use a proper (!) facemask with the right filters (which I do).
First of all, I cut tiny pieces of masking tape and apply it to the tank. This will look like spots where the zimmerit has fallen off later.
Now apply the cement to the model. Don't use too much, or your pattern will look blurred, because the plastic will be soluted so much, that it will slowly flow back after you worked it. You'll need to try and find the right amount of cement for every specific model (u know, the plastic differs and stuff like that...)
Should look something like this now:
Now wait for 10 minutes. I use a timer, as I'm likely to be distracted by something shiny and I'd surely forget about my little elefant here ;)
Meanwhile you can prepare your screwdriver. As I didn't have one in the perfect size, I used sanding paper (800) to sand it to the correct size.
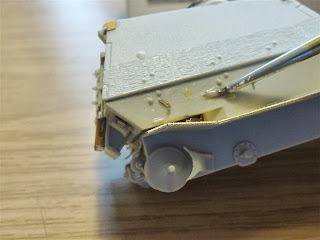
When the time's run out, start the pattern on the middle of the prepared surface. Why? You're likely to have skewed edges like on the back of the elefant. If you start there, you probably won't be able to get a perpendicular zimmerit pattern. So just start somewhere in the middle and work your way to the outside (it can be seen if you zoom in)
Place your screwdriver on the plastic and push it in. Regard that the whole edge of the blade digs into the plastic evenly. If you hold your screwdriver in an angle (not the blade like in the picture! This must be in a square angle to the perpendicular!) while pushing, you won't get a rectangular imprint which is not what we are going for. So set your handle in an 45° angle.
Since you won't be able to reach all the places with your Screwdriver, you' sometimes need to use your exacto knife. Just draw short lines, similar to what you'd archieve with the screwdriver.
If the plastic is already getting to hard to work with, apply a very small amount of cement to those places and WAIT for 5 minutes, before working on them. Again, if you are too eager, the plastic will stretch out again while still being soluted.
When you're done, use your exacto knife to dislodge the masking tape. Don't wait too long with it, as it might melt right into place.
If you work carefully, you can achive a nice pattern as on the top-half; If you want to go for the sloppy look, simply do it sloppy ;) Always keep in mind that Zimmerit has been applied by humans and doesn't look to perfect most of the time.
I hope you like it. Remember to take care of your health and please follow the hints I gave above. I won't sign responsible if your grey matter flows out of your nose and ears ;)
Best Regards,
Mojo


nice tutorial. Thanks. I have book marked this.
ReplyDeleteNice work, Mojo. It's for sure your Zimmerit won't fall off, using this method. I like it.!
ReplyDeletegood job!
ReplyDeletei use another method, but i'll try this one.
thanks for sharing.
bye
Excellent tutorial. Thanks Mario!
ReplyDeleteAn excellent post! I will put this into the to do list.
ReplyDeleteNice work.